> ## Documentation Index
> Fetch the complete documentation index at: https://docs.digifist.com/llms.txt
> Use this file to discover all available pages before exploring further.
# Password page
> Customize your password-protected store page with email signup and launch messaging.
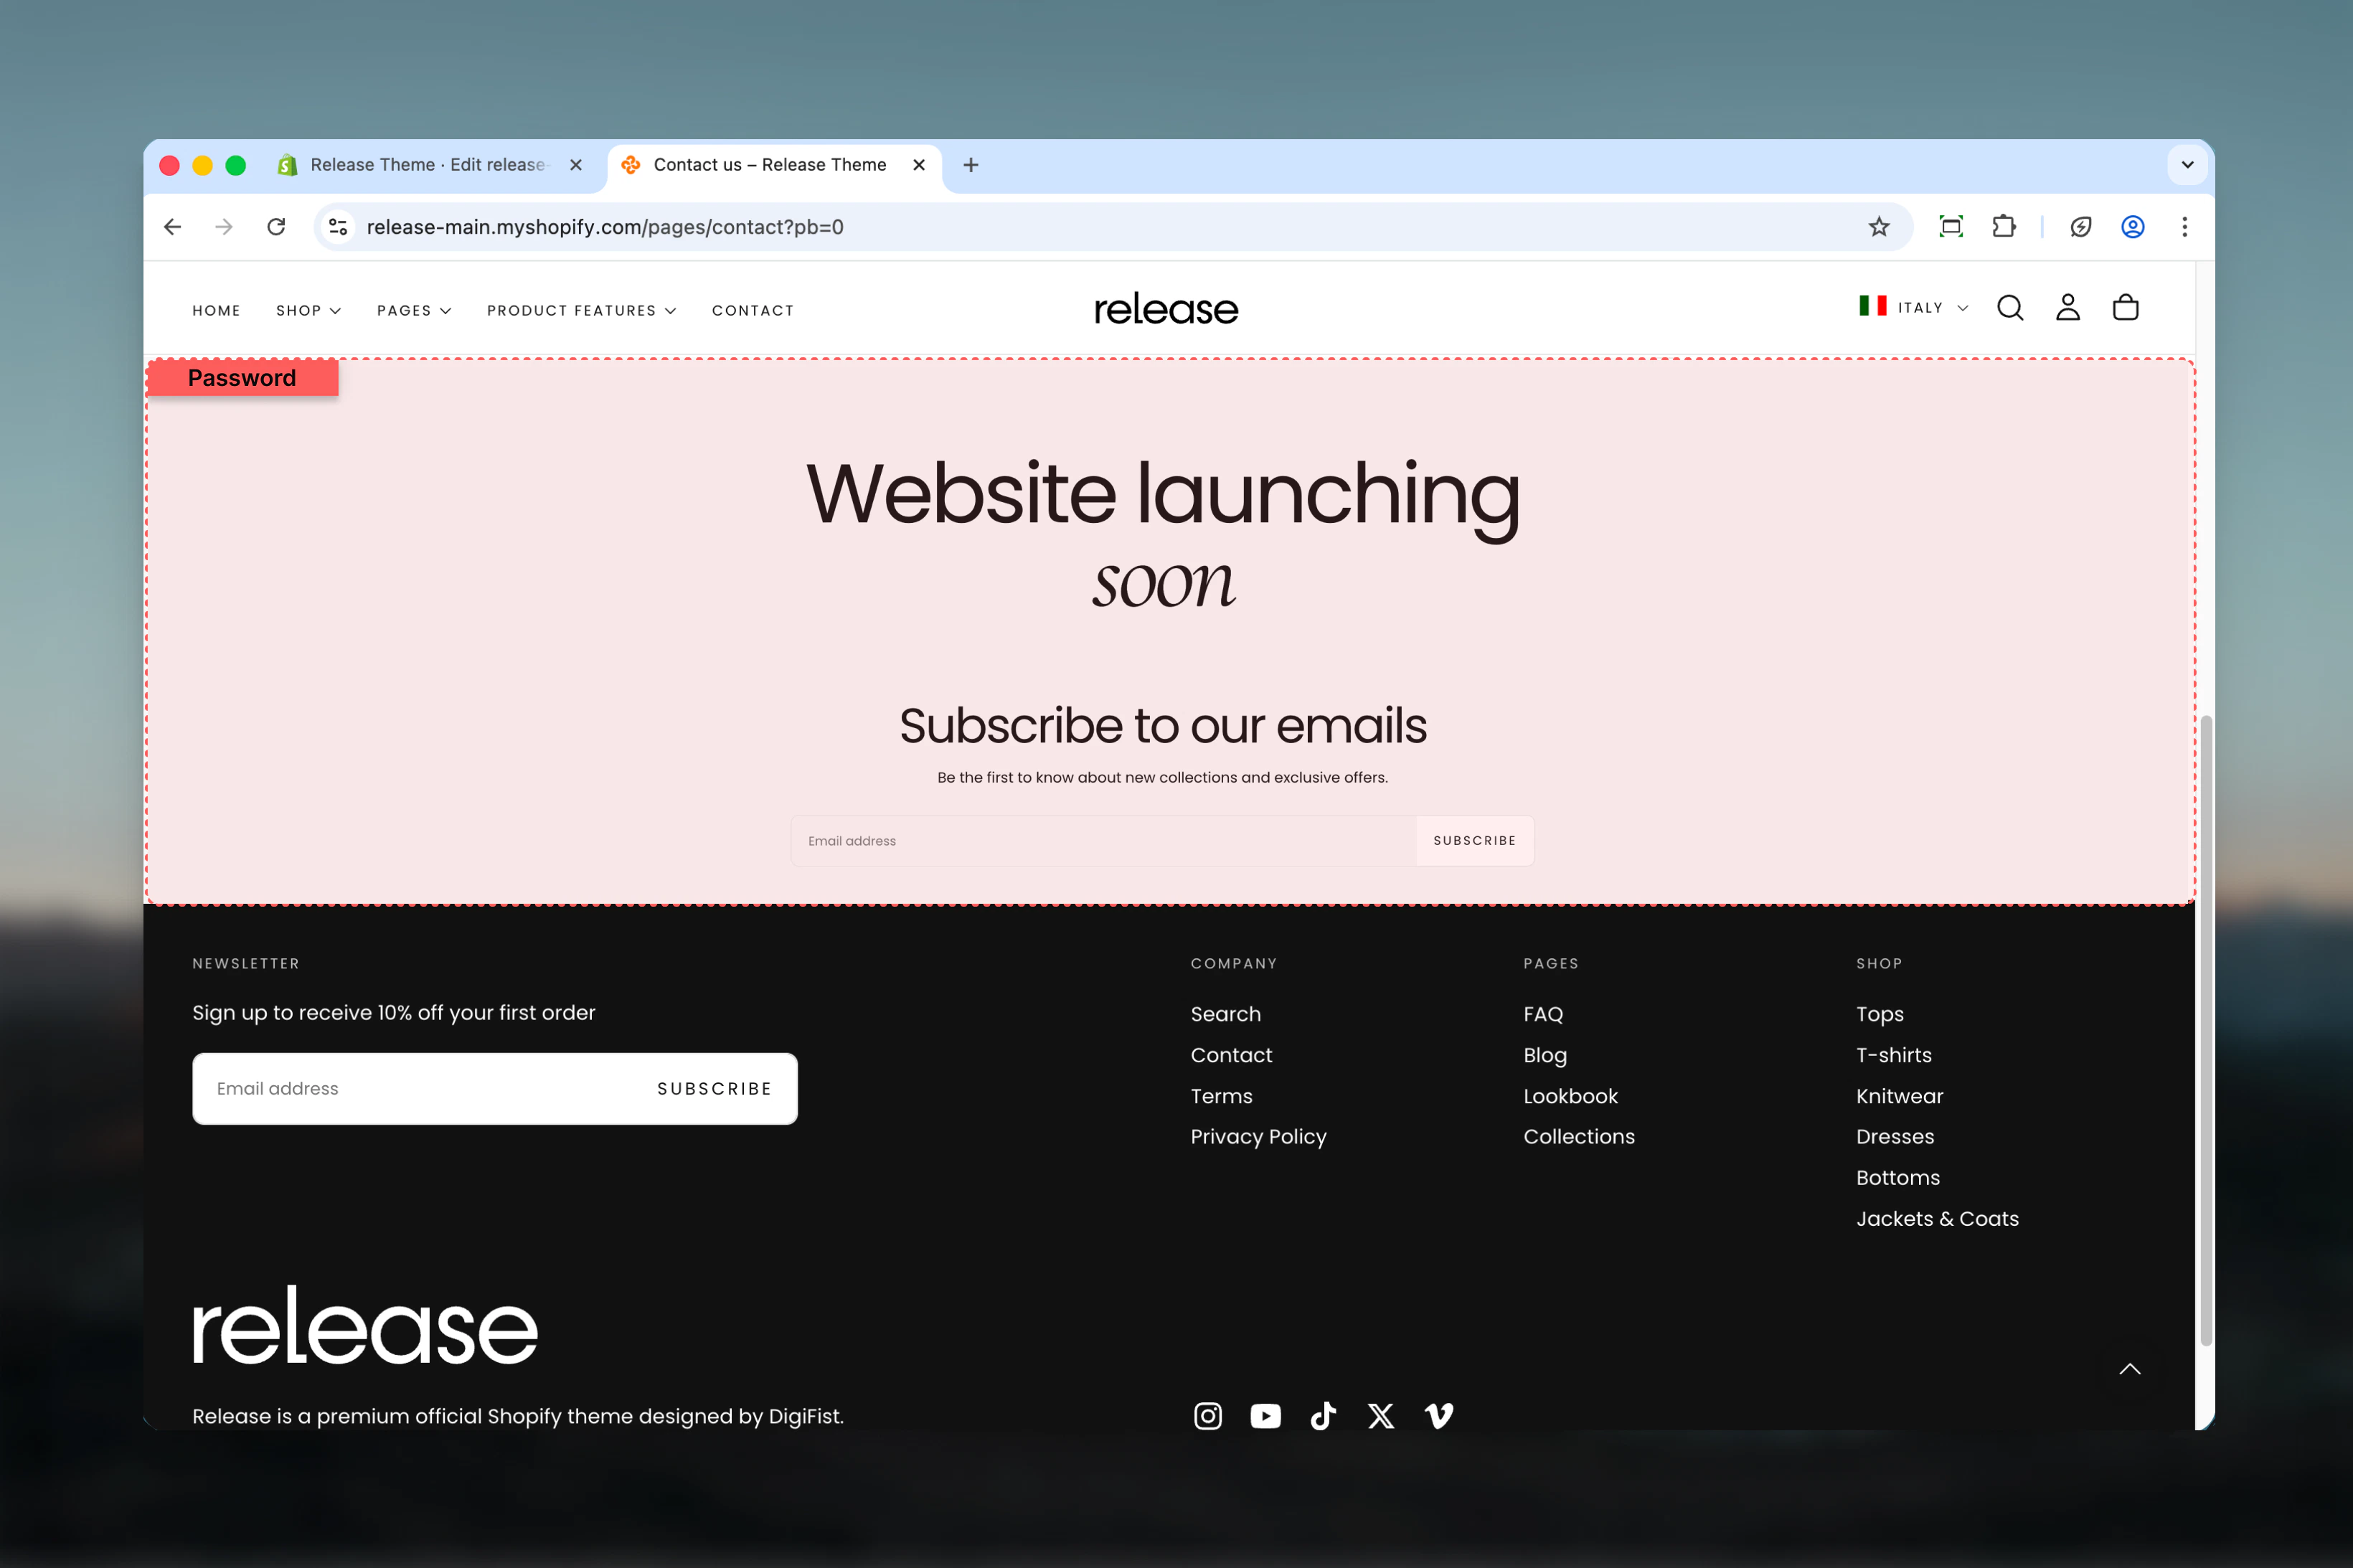
The password page displays when your store is password-protected, allowing you to collect email signups while building anticipation for your store launch. Customers see this page until you remove password protection or enter the correct password.
 ## What this section controls
This page template manages:
* **Launch messaging** - Headline and description for your upcoming store opening
* **Email signup form** - Collect customer emails for launch notifications
* **Password access** - Display password-protected page before store launch
* **Pre-launch branding** - Present your brand identity before official opening
* **Coming soon content** - Build anticipation and excitement for launch
* **Section layout** - Adjust page width, color scheme, and spacing
## Getting started
First, password-protect your store in Shopify settings:
1. Go to **Online Store → Preferences** in Shopify admin
2. Scroll to **Password protection** section
3. Enable **Restrict access to visitors with the password**
4. Set your password
5. Add optional message for visitors
6. Save changes
Once enabled, all visitors will see the password page unless they enter the correct password or you share a preview link.
From Shopify admin, access the Theme Customizer to design your password page
In the left sidebar, click **Pages** > **Password**
Add compelling title and description text that explains when you're launching and what makes your store special
Enable the email signup form to collect customer emails for launch notifications. Customize the signup title and description.
Set section width (recommend narrow for focus), choose color scheme, and adjust spacing
Use the preview link to see how your password page appears to visitors. Test the email signup form.
## Section Settings
Control the main messaging displayed on your password-protected page.
**Type:** Text input\
**Default:** "Opening soon"
Main heading for the password page. This is the first thing visitors see.
**Example titles:**
* "Opening soon"
* "Coming this fall"
* "Launching March 2026"
* "Under construction"
* "Something amazing is coming"
Include a specific date or timeframe when possible. "Opening March 15" creates more anticipation than "Coming soon".
**Type:** Rich text editor\
**Default:** Empty
Description or announcement text below the title. Use this to explain your store concept, launch timeline, or value proposition.
Supports rich text formatting:
* Bold and italic text
* Line breaks
* Multiple paragraphs
**Example text:**
* "We're putting the finishing touches on our new online store. Sign up below to be the first to know when we launch!"
* "Premium sustainable fashion arrives this spring. Join our list for exclusive launch-day offers."
* "Currently redesigning our shopping experience. We'll be back soon with exciting new products!"
Keep messaging exciting and clear. Focus on what makes your store unique and why customers should sign up for notifications.
## What this section controls
This page template manages:
* **Launch messaging** - Headline and description for your upcoming store opening
* **Email signup form** - Collect customer emails for launch notifications
* **Password access** - Display password-protected page before store launch
* **Pre-launch branding** - Present your brand identity before official opening
* **Coming soon content** - Build anticipation and excitement for launch
* **Section layout** - Adjust page width, color scheme, and spacing
## Getting started
First, password-protect your store in Shopify settings:
1. Go to **Online Store → Preferences** in Shopify admin
2. Scroll to **Password protection** section
3. Enable **Restrict access to visitors with the password**
4. Set your password
5. Add optional message for visitors
6. Save changes
Once enabled, all visitors will see the password page unless they enter the correct password or you share a preview link.
From Shopify admin, access the Theme Customizer to design your password page
In the left sidebar, click **Pages** > **Password**
Add compelling title and description text that explains when you're launching and what makes your store special
Enable the email signup form to collect customer emails for launch notifications. Customize the signup title and description.
Set section width (recommend narrow for focus), choose color scheme, and adjust spacing
Use the preview link to see how your password page appears to visitors. Test the email signup form.
## Section Settings
Control the main messaging displayed on your password-protected page.
**Type:** Text input\
**Default:** "Opening soon"
Main heading for the password page. This is the first thing visitors see.
**Example titles:**
* "Opening soon"
* "Coming this fall"
* "Launching March 2026"
* "Under construction"
* "Something amazing is coming"
Include a specific date or timeframe when possible. "Opening March 15" creates more anticipation than "Coming soon".
**Type:** Rich text editor\
**Default:** Empty
Description or announcement text below the title. Use this to explain your store concept, launch timeline, or value proposition.
Supports rich text formatting:
* Bold and italic text
* Line breaks
* Multiple paragraphs
**Example text:**
* "We're putting the finishing touches on our new online store. Sign up below to be the first to know when we launch!"
* "Premium sustainable fashion arrives this spring. Join our list for exclusive launch-day offers."
* "Currently redesigning our shopping experience. We'll be back soon with exciting new products!"
Keep messaging exciting and clear. Focus on what makes your store unique and why customers should sign up for notifications.
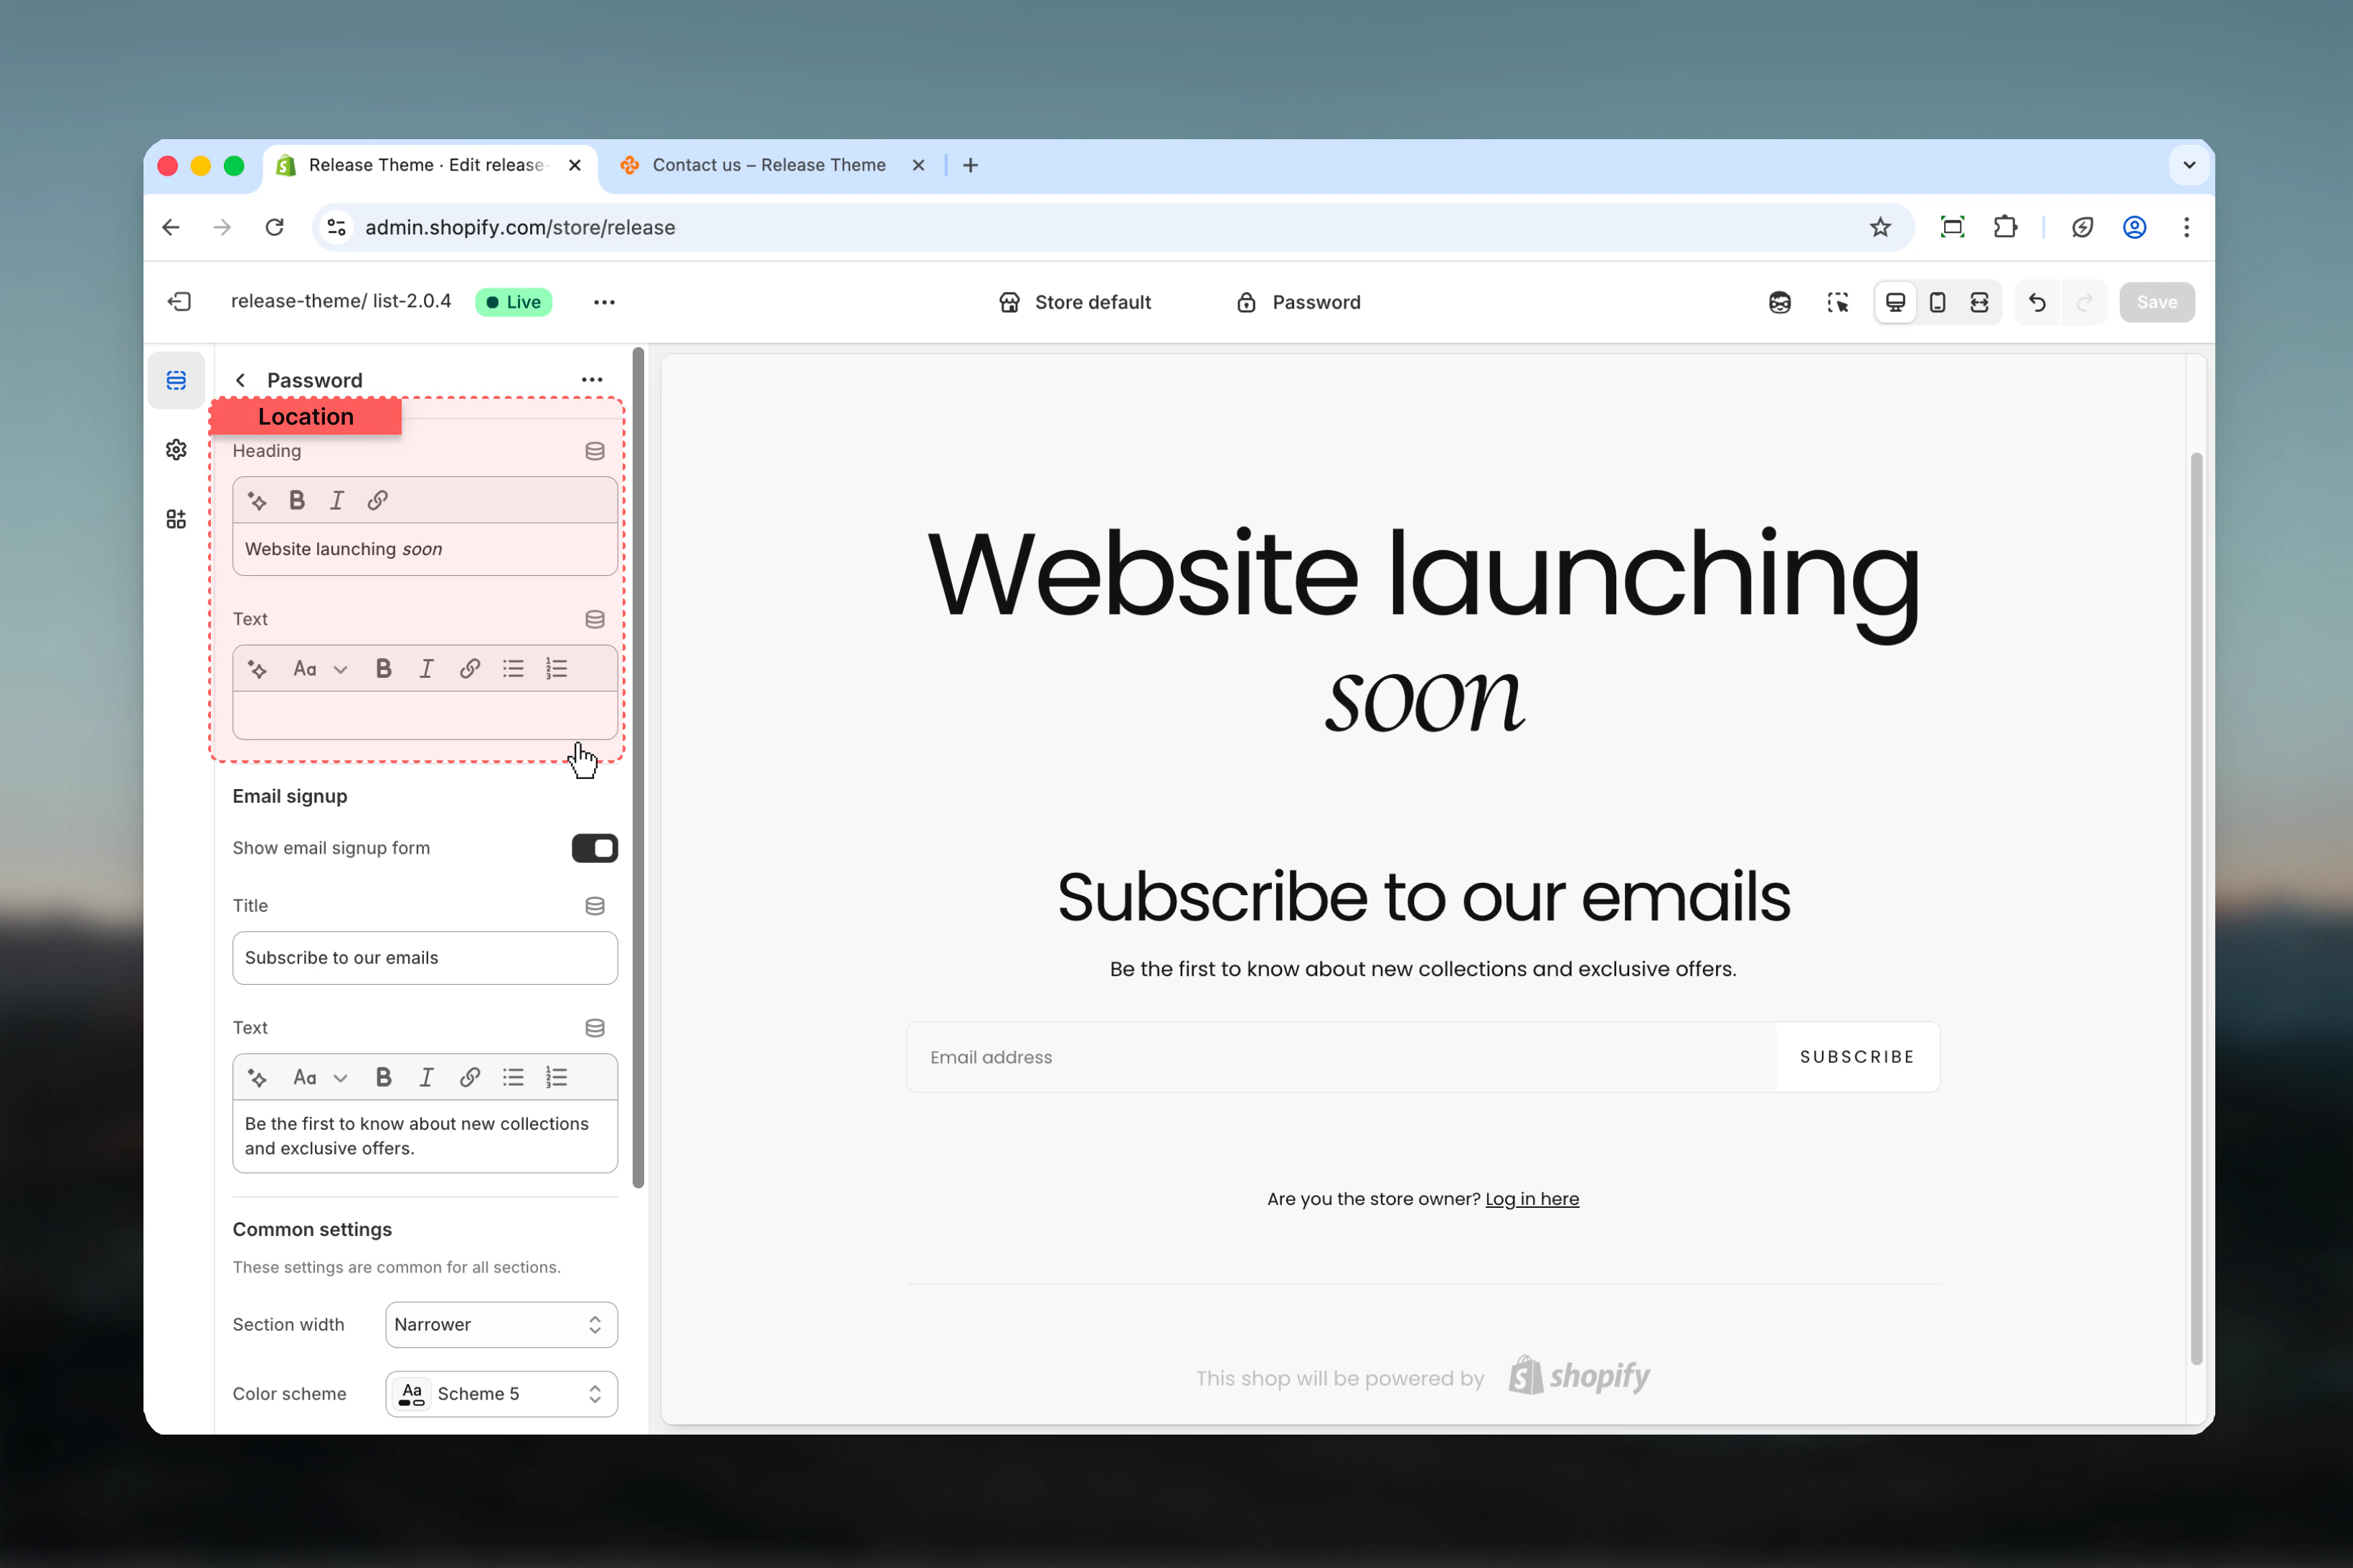 Configure the email collection form for building your launch audience.
**Type:** Toggle\
**Default:** Enabled
Display an email collection form for launch notifications. When enabled, visitors can submit their email address to be notified when you launch.
Collected emails are stored in Shopify admin and can be exported for email marketing campaigns.
Always enable email signup for pre-launch stores. Building an email list before launch creates immediate sales opportunities when you open.
Collected emails appear in Shopify admin under **Marketing → Email subscribers**. Export them to use with email marketing platforms like Klaviyo or Mailchimp.
**Type:** Text input\
**Default:** Empty
Heading for the email signup section. This introduces the email form and encourages signups.
**Example titles:**
* "Get notified when we launch"
* "Be the first to shop"
* "Join the waitlist"
* "Subscribe for launch updates"
* "Don't miss our opening"
Use action-oriented language that emphasizes the benefit of signing up (early access, exclusive offers, first look).
**Type:** Text input\
**Default:** Empty
Description or call-to-action text for the email signup form. Explains what subscribers will receive.
**Example text:**
* "Be the first to know about our grand opening and exclusive launch offers"
* "Get early access to new arrivals and a special welcome discount"
* "Join our VIP list for exclusive previews and launch-day deals"
* "Subscribe to receive opening date alerts and insider updates"
Mention specific benefits like "exclusive launch discount" or "early access" to increase signup rates.
Configure the email collection form for building your launch audience.
**Type:** Toggle\
**Default:** Enabled
Display an email collection form for launch notifications. When enabled, visitors can submit their email address to be notified when you launch.
Collected emails are stored in Shopify admin and can be exported for email marketing campaigns.
Always enable email signup for pre-launch stores. Building an email list before launch creates immediate sales opportunities when you open.
Collected emails appear in Shopify admin under **Marketing → Email subscribers**. Export them to use with email marketing platforms like Klaviyo or Mailchimp.
**Type:** Text input\
**Default:** Empty
Heading for the email signup section. This introduces the email form and encourages signups.
**Example titles:**
* "Get notified when we launch"
* "Be the first to shop"
* "Join the waitlist"
* "Subscribe for launch updates"
* "Don't miss our opening"
Use action-oriented language that emphasizes the benefit of signing up (early access, exclusive offers, first look).
**Type:** Text input\
**Default:** Empty
Description or call-to-action text for the email signup form. Explains what subscribers will receive.
**Example text:**
* "Be the first to know about our grand opening and exclusive launch offers"
* "Get early access to new arrivals and a special welcome discount"
* "Join our VIP list for exclusive previews and launch-day deals"
* "Subscribe to receive opening date alerts and insider updates"
Mention specific benefits like "exclusive launch discount" or "early access" to increase signup rates.
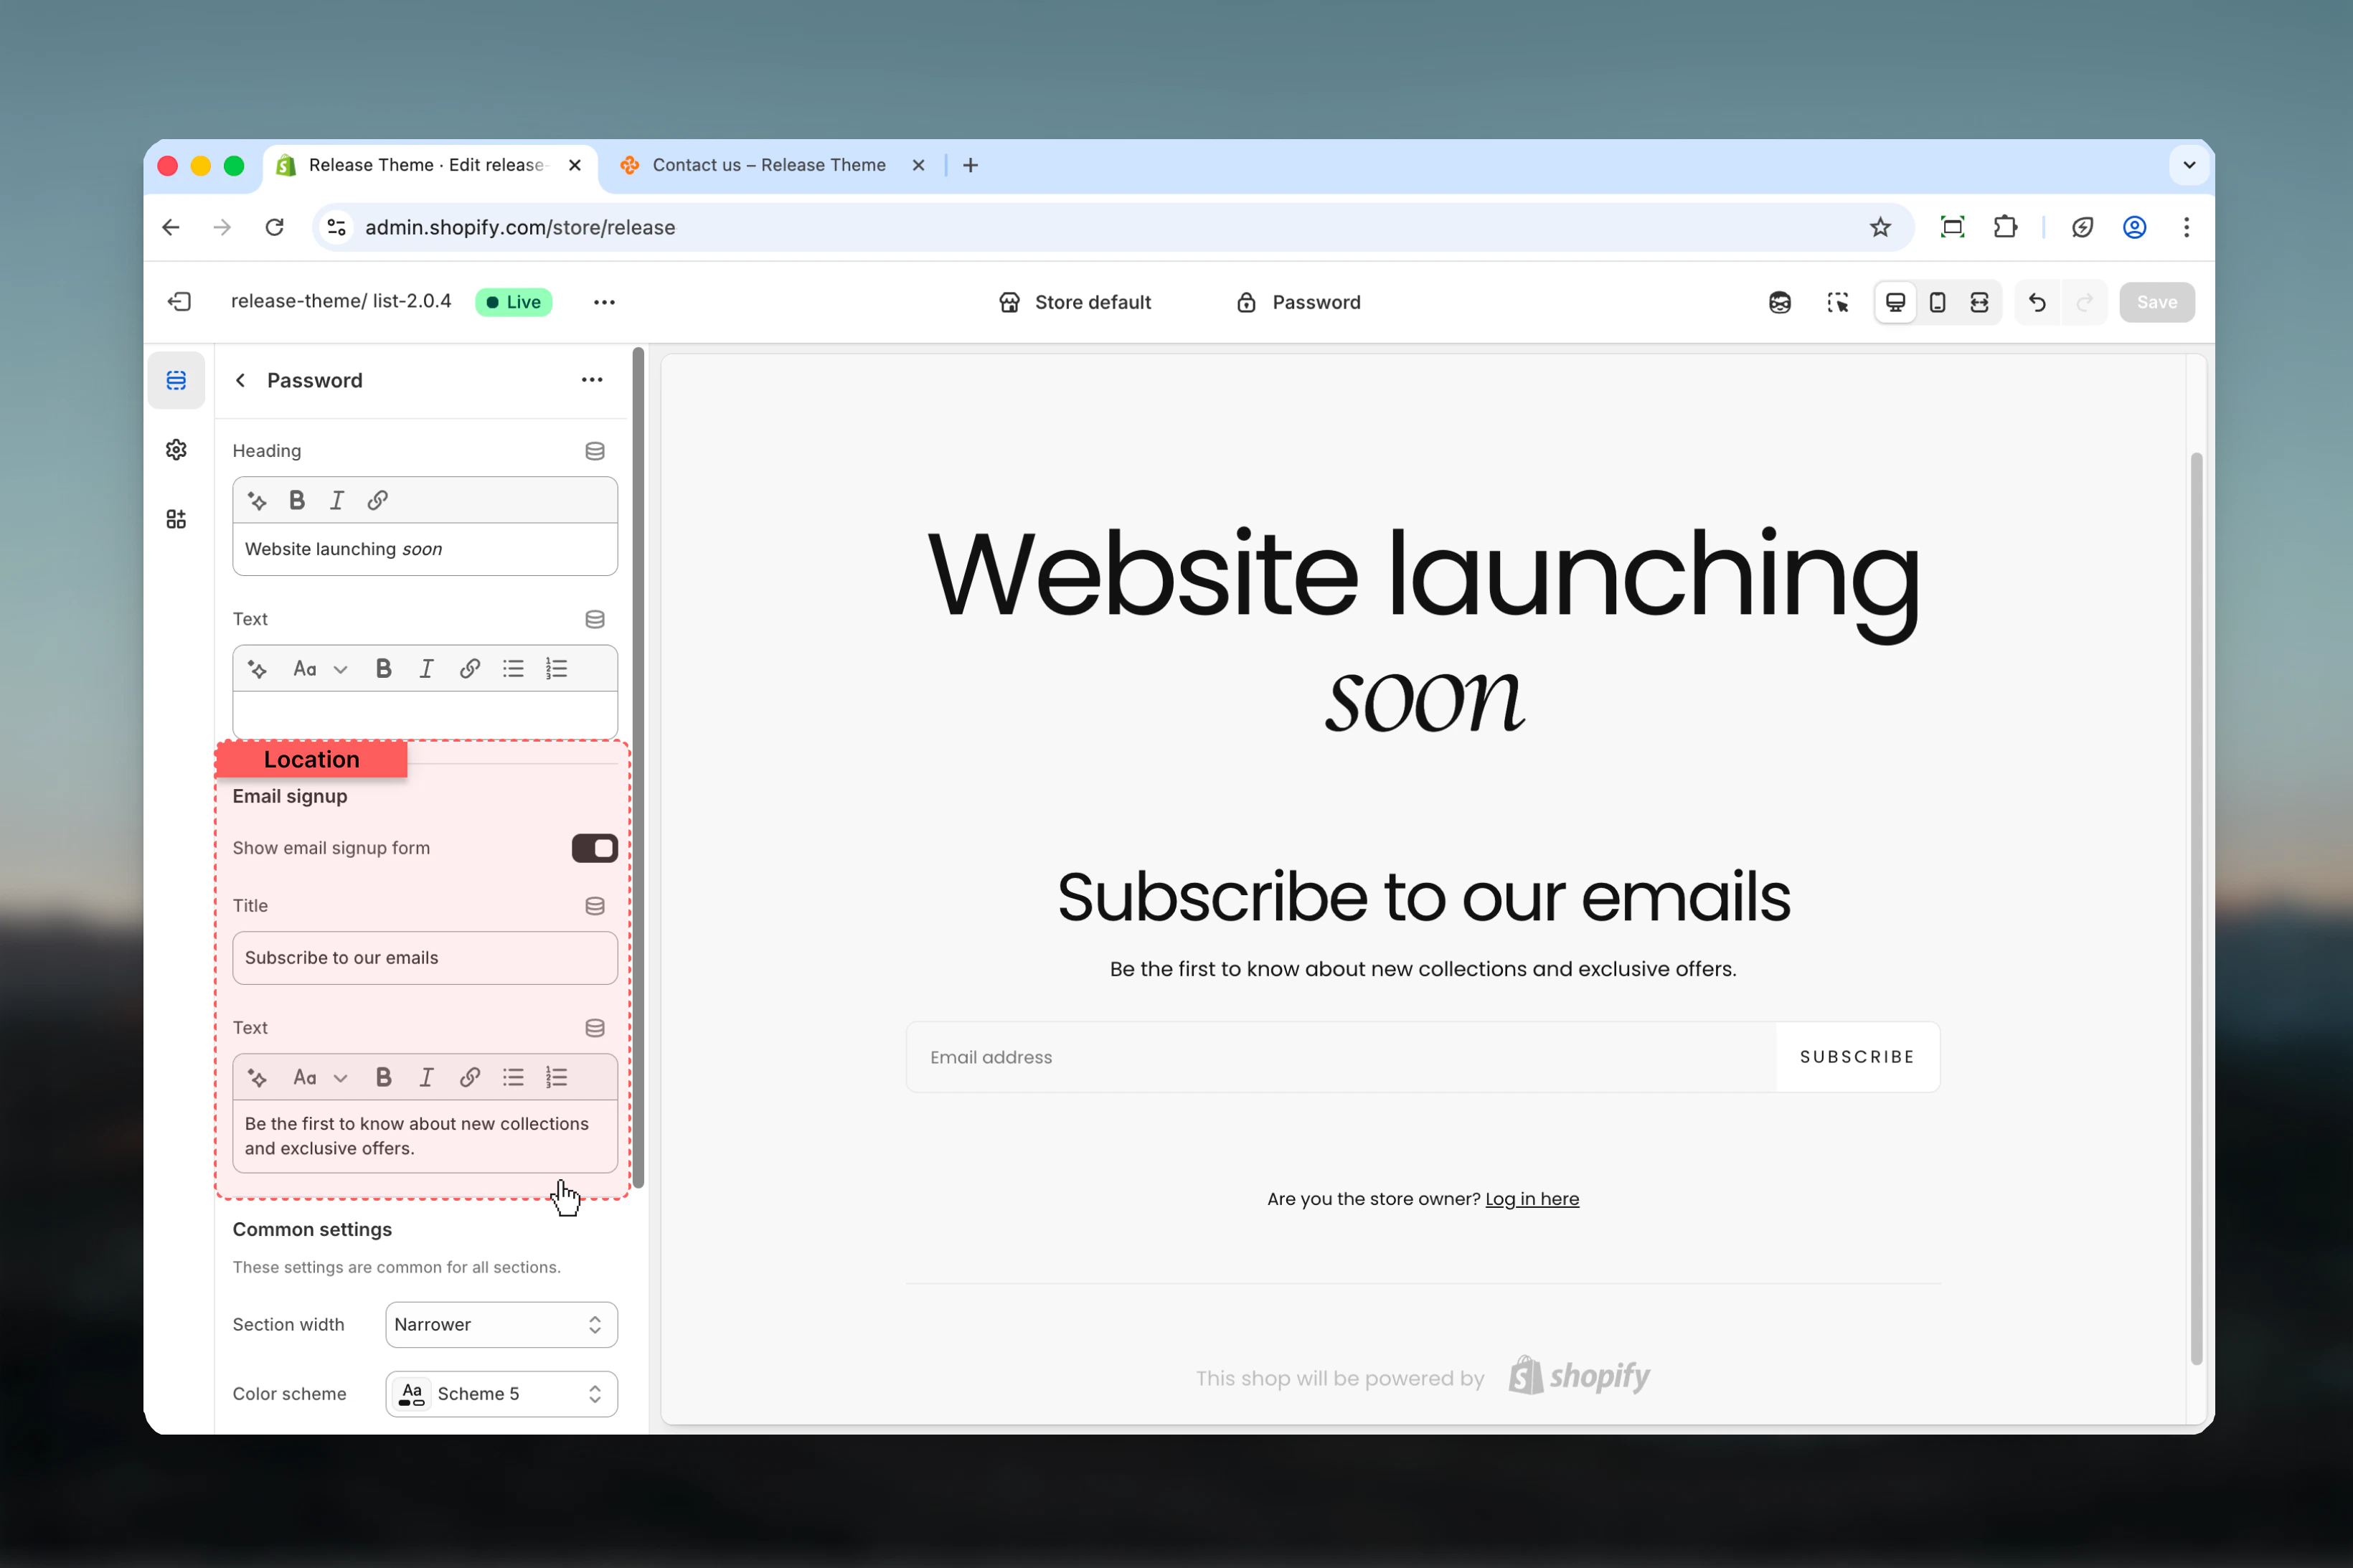 Control the overall page layout, width, and spacing.
**Type:** Dropdown\
**Options:** max-w-page, max-w-narrower, max-w-fluid\
**Default:** max-w-narrower
Maximum width of the password page content:
* **max-w-narrower** - Narrow focused layout (recommended) - Creates focused, centered experience
* **max-w-page** - Standard container width - Matches regular page width
* **max-w-fluid** - Wider container - Uses more screen space
Use max-w-narrower (default) for best results. The narrow layout keeps visitor focus on your message and email signup form.
**Type:** Dropdown\
**Default:** scheme-1
Select the color scheme for the password page. Available schemes are defined in **Theme settings > Colors**.
Choose a color scheme that reflects your brand identity. This is often visitors' first impression of your store.
**Type:** Dropdown\
**Options:** No (0), S (1), M (2), L (4), XL (6)\
**Default:** M (2)
Padding above the password page content, controlling vertical space from the top of the page.
**Type:** Dropdown\
**Options:** No (0), S (1), M (2), L (4), XL (6)\
**Default:** M (2)
Padding below the password page content, controlling vertical space to the bottom of the page.
Control the overall page layout, width, and spacing.
**Type:** Dropdown\
**Options:** max-w-page, max-w-narrower, max-w-fluid\
**Default:** max-w-narrower
Maximum width of the password page content:
* **max-w-narrower** - Narrow focused layout (recommended) - Creates focused, centered experience
* **max-w-page** - Standard container width - Matches regular page width
* **max-w-fluid** - Wider container - Uses more screen space
Use max-w-narrower (default) for best results. The narrow layout keeps visitor focus on your message and email signup form.
**Type:** Dropdown\
**Default:** scheme-1
Select the color scheme for the password page. Available schemes are defined in **Theme settings > Colors**.
Choose a color scheme that reflects your brand identity. This is often visitors' first impression of your store.
**Type:** Dropdown\
**Options:** No (0), S (1), M (2), L (4), XL (6)\
**Default:** M (2)
Padding above the password page content, controlling vertical space from the top of the page.
**Type:** Dropdown\
**Options:** No (0), S (1), M (2), L (4), XL (6)\
**Default:** M (2)
Padding below the password page content, controlling vertical space to the bottom of the page.
 ## How password protection works
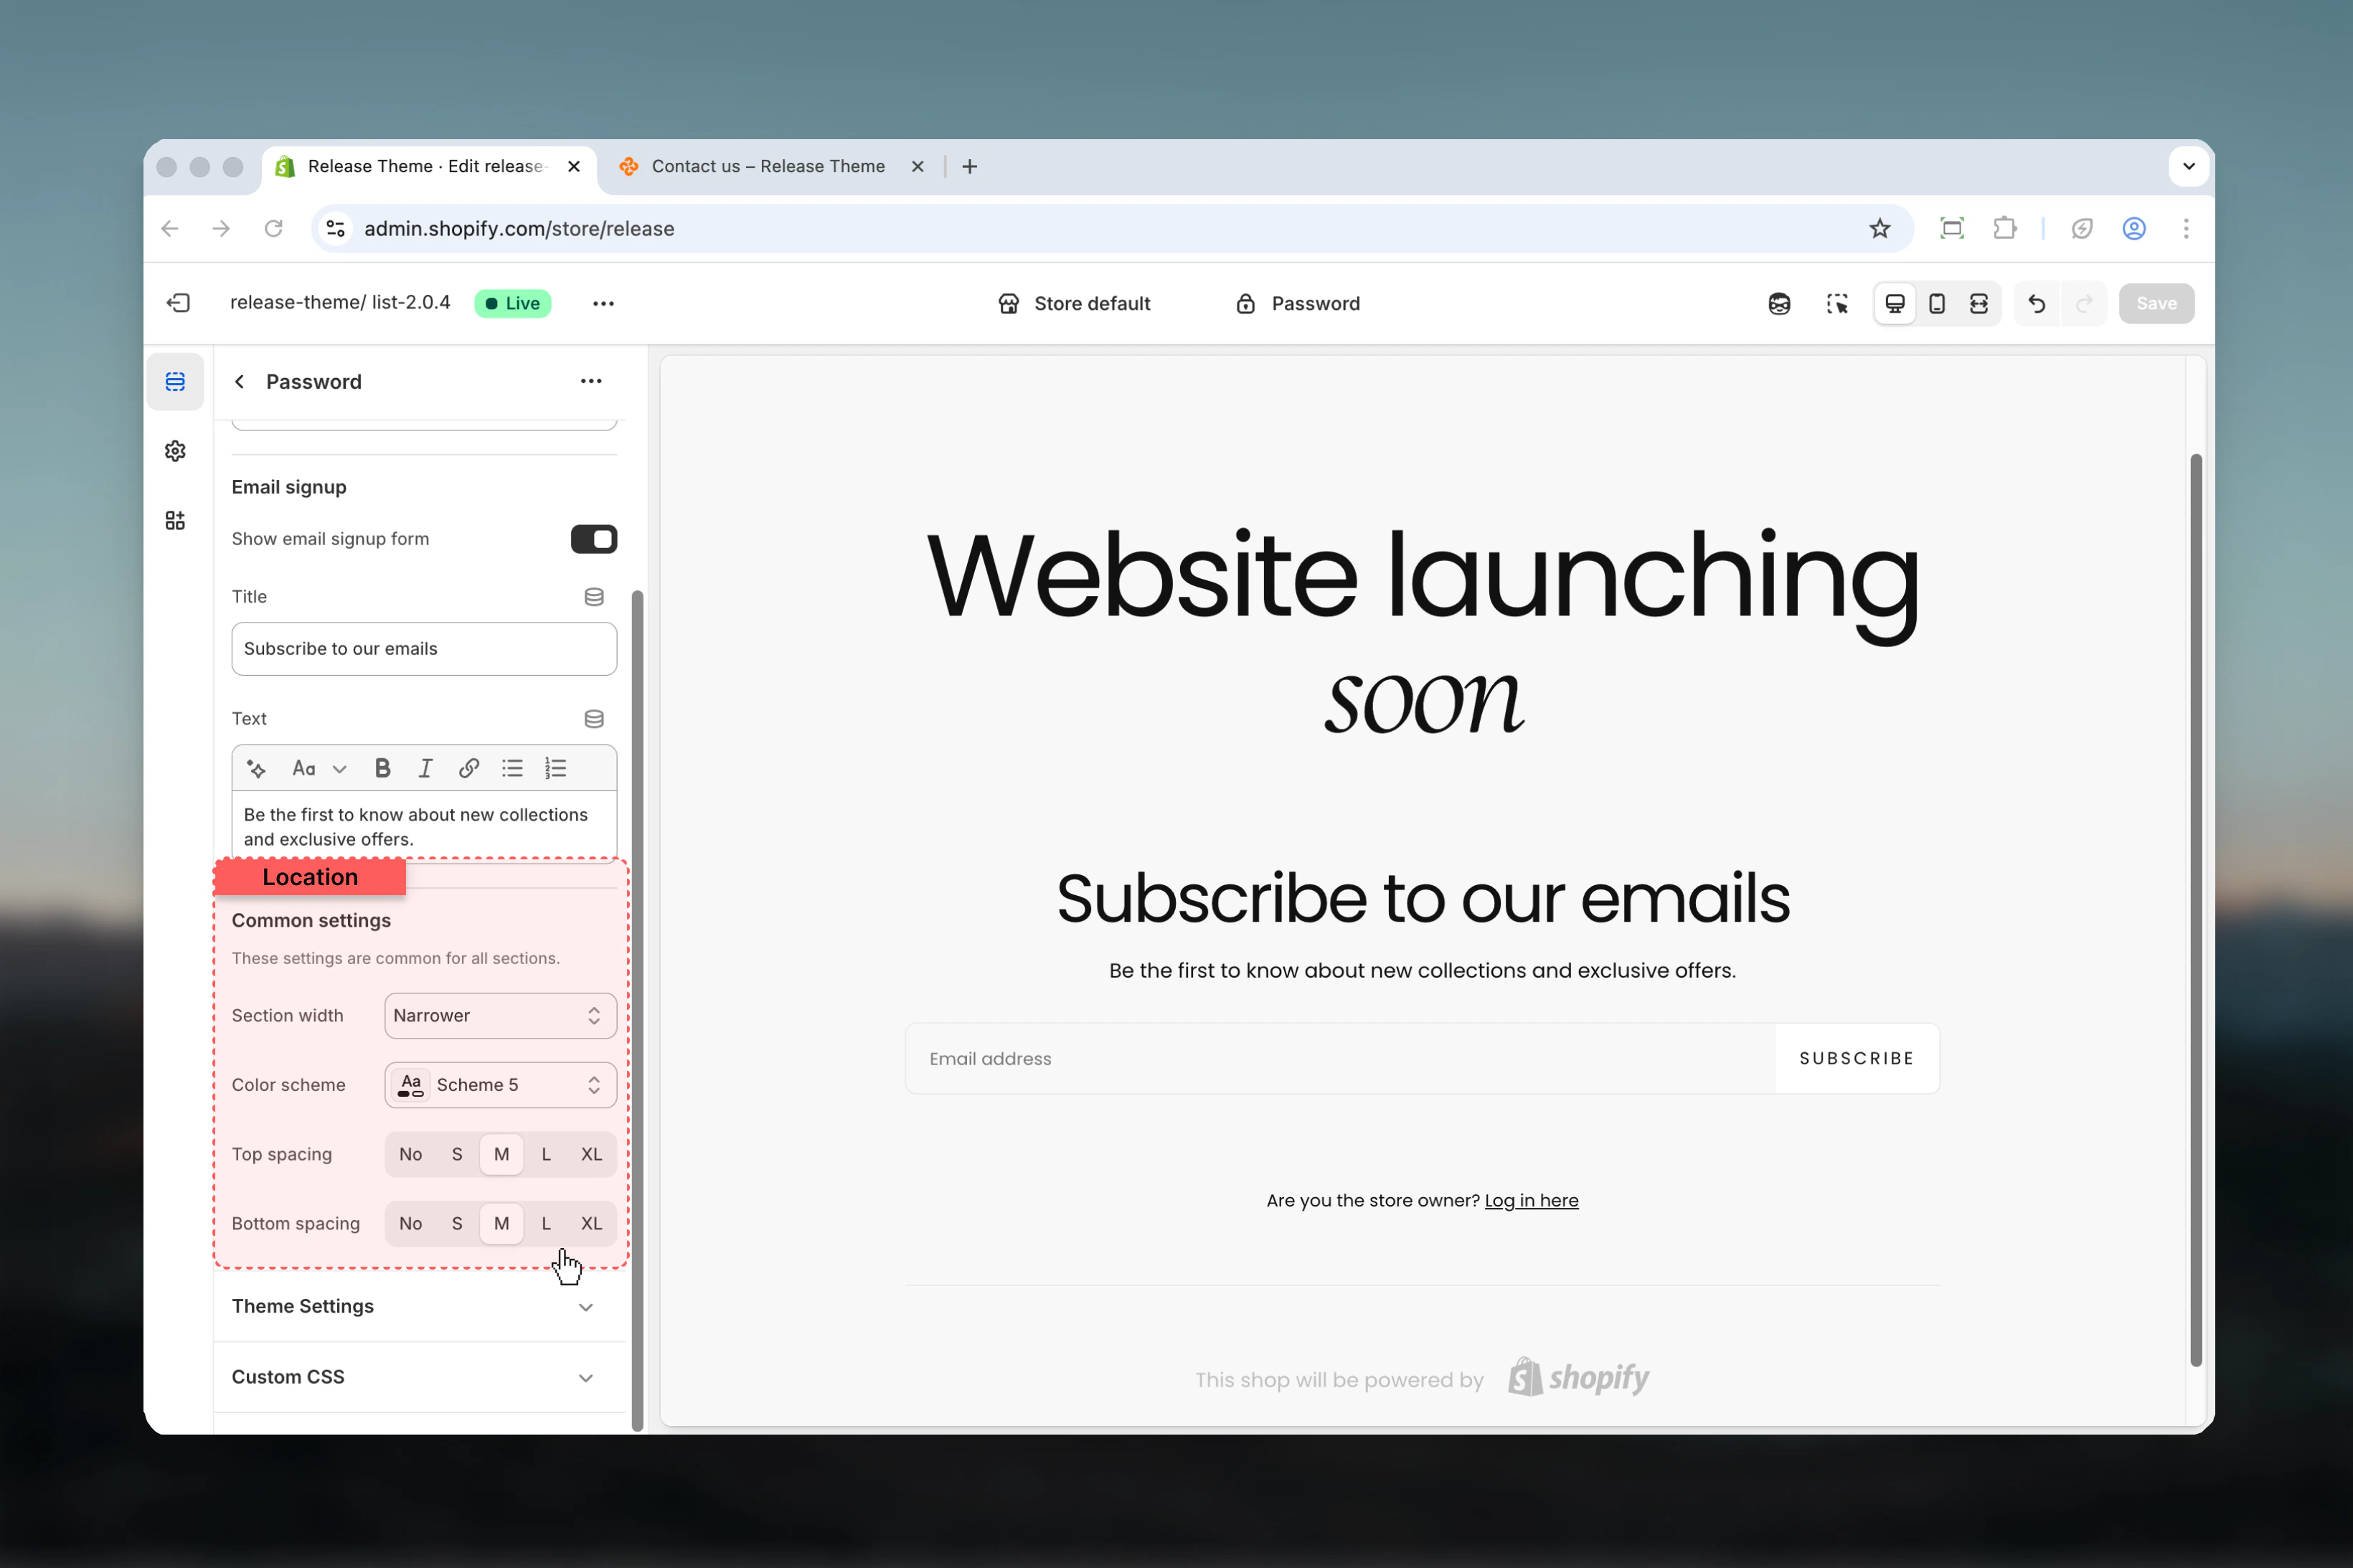
The password page is a special template that appears when you enable password protection in your Shopify store settings. Here's how the flow works:
1. **Password protection enabled** - Store is locked to public visitors
2. **Visitor arrives** - Sees password page with your custom messaging
3. **Three options:**
* Enter correct password → Access store
* Submit email → Added to launch notification list
* Leave page → Can return later with password or when you launch
**Accessing your store:**
* **Password holders** - Anyone with the password can access the full store
* **Preview link** - Share a special preview link that bypasses password (useful for partners, investors, testers)
* **Store owner** - You always have access through Shopify admin
**When to remove password protection:**
Remove password protection when you're ready for public launch. Your store becomes immediately accessible to everyone.
Removing password protection cannot be easily undone. Make sure your store is fully ready for public access before removing the password.
## Common use cases
Building anticipation before your official store opening.
**Configuration:**
* Title: "Opening \[specific date]"
* Text: Clear value proposition and what makes store unique
* Enable email signup: Yes
* Email signup title: "Be the first to shop"
* Section width: max-w-narrower
**Strategy:**
* Set specific launch date
* Offer launch-day discount for email subscribers
* Share preview link with close network
* Build email list for 30-90 days before launch
Collect 100-500+ emails before launch to generate immediate sales on opening day.
Launching a new collection or product category.
**Configuration:**
* Title: "New collection launching soon"
* Text: Tease the upcoming products
* Enable email signup: Yes
* Email signup title: "Get notified at launch"
* Section width: max-w-narrower
**Strategy:**
* Build anticipation for major product drop
* Create exclusive access feeling
* Use for limited edition or seasonal collections
* Password protect specific pages, not entire store
Temporary closure for store updates or redesign.
**Configuration:**
* Title: "We'll be back soon"
* Text: "We're making improvements to your shopping experience"
* Enable email signup: Optional (if major changes)
* Section width: max-w-narrower
**Strategy:**
* Brief closure for technical work
* Inform customers of expected return date
* Maintain customer trust with clear communication
* Use preview link for testing new features
Wholesale or trade-only store with password access.
**Configuration:**
* Title: "Wholesale account required"
* Text: "This is our wholesale portal. Contact us for access."
* Enable email signup: No
* Section width: max-w-narrower
**Strategy:**
* Password protect permanently for B2B access
* Share password with approved wholesale customers
* Include contact information for account requests
* Keep public retail store separate
Limited access testing phase with select customers.
**Configuration:**
* Title: "Exclusive early access"
* Text: "We're in beta testing with select customers"
* Enable email signup: Yes
* Email signup title: "Join the waitlist"
* Section width: max-w-narrower
**Strategy:**
* Test with 50-200 customers before full launch
* Gather feedback on products, pricing, UX
* Share password with early adopters and brand advocates
* Build testimonials and social proof
* Transition to public launch after testing period
Temporary or seasonal businesses announcing next opening.
**Configuration:**
* Title: "We're closed for the season"
* Text: "We'll reopen \[month/season]. Subscribe for opening alerts."
* Enable email signup: Yes
* Email signup title: "Get notified when we reopen"
* Section width: max-w-narrower
**Strategy:**
* Seasonal stores (summer, holidays, etc.)
* Pop-up shops between events
* Build anticipation for next season
* Stay connected with customers during off-season
## Best practices
State exactly when you're launching when possible. "Opening March 15" is far more effective than "Coming soon". Specific dates create urgency.
Enable email signup for pre-launch stores. Building an email list before launch creates immediate sales opportunities when you open.
Clearly explain what makes your store unique and why customers should care about your launch. What problem do you solve?
Use max-w-narrower (default) for focused experience. The narrow width keeps attention on your message and signup form.
Create excitement about your launch. Use enthusiastic, benefit-focused language. Avoid vague "coming soon" messaging.
Offer exclusive launch discount or early access to email subscribers. "Sign up for 15% off opening day" increases conversions.
Share password or preview link with testers, investors, partners, and press for feedback before public launch.
Mention any press coverage, awards, founder credentials, or milestones that build credibility and trust.
Test password page on mobile devices. Many visitors will discover your store on mobile first.
Before launch, export email list from Shopify admin. Import to email marketing platform for launch campaign.
## Related guides
Learn how to enable and manage password protection in Shopify
Customize your 404 error page template
Use collected emails for launch campaigns in Shopify
Configure color schemes used on password page
## How password protection works
The password page is a special template that appears when you enable password protection in your Shopify store settings. Here's how the flow works:
1. **Password protection enabled** - Store is locked to public visitors
2. **Visitor arrives** - Sees password page with your custom messaging
3. **Three options:**
* Enter correct password → Access store
* Submit email → Added to launch notification list
* Leave page → Can return later with password or when you launch
**Accessing your store:**
* **Password holders** - Anyone with the password can access the full store
* **Preview link** - Share a special preview link that bypasses password (useful for partners, investors, testers)
* **Store owner** - You always have access through Shopify admin
**When to remove password protection:**
Remove password protection when you're ready for public launch. Your store becomes immediately accessible to everyone.
Removing password protection cannot be easily undone. Make sure your store is fully ready for public access before removing the password.
## Common use cases
Building anticipation before your official store opening.
**Configuration:**
* Title: "Opening \[specific date]"
* Text: Clear value proposition and what makes store unique
* Enable email signup: Yes
* Email signup title: "Be the first to shop"
* Section width: max-w-narrower
**Strategy:**
* Set specific launch date
* Offer launch-day discount for email subscribers
* Share preview link with close network
* Build email list for 30-90 days before launch
Collect 100-500+ emails before launch to generate immediate sales on opening day.
Launching a new collection or product category.
**Configuration:**
* Title: "New collection launching soon"
* Text: Tease the upcoming products
* Enable email signup: Yes
* Email signup title: "Get notified at launch"
* Section width: max-w-narrower
**Strategy:**
* Build anticipation for major product drop
* Create exclusive access feeling
* Use for limited edition or seasonal collections
* Password protect specific pages, not entire store
Temporary closure for store updates or redesign.
**Configuration:**
* Title: "We'll be back soon"
* Text: "We're making improvements to your shopping experience"
* Enable email signup: Optional (if major changes)
* Section width: max-w-narrower
**Strategy:**
* Brief closure for technical work
* Inform customers of expected return date
* Maintain customer trust with clear communication
* Use preview link for testing new features
Wholesale or trade-only store with password access.
**Configuration:**
* Title: "Wholesale account required"
* Text: "This is our wholesale portal. Contact us for access."
* Enable email signup: No
* Section width: max-w-narrower
**Strategy:**
* Password protect permanently for B2B access
* Share password with approved wholesale customers
* Include contact information for account requests
* Keep public retail store separate
Limited access testing phase with select customers.
**Configuration:**
* Title: "Exclusive early access"
* Text: "We're in beta testing with select customers"
* Enable email signup: Yes
* Email signup title: "Join the waitlist"
* Section width: max-w-narrower
**Strategy:**
* Test with 50-200 customers before full launch
* Gather feedback on products, pricing, UX
* Share password with early adopters and brand advocates
* Build testimonials and social proof
* Transition to public launch after testing period
Temporary or seasonal businesses announcing next opening.
**Configuration:**
* Title: "We're closed for the season"
* Text: "We'll reopen \[month/season]. Subscribe for opening alerts."
* Enable email signup: Yes
* Email signup title: "Get notified when we reopen"
* Section width: max-w-narrower
**Strategy:**
* Seasonal stores (summer, holidays, etc.)
* Pop-up shops between events
* Build anticipation for next season
* Stay connected with customers during off-season
## Best practices
State exactly when you're launching when possible. "Opening March 15" is far more effective than "Coming soon". Specific dates create urgency.
Enable email signup for pre-launch stores. Building an email list before launch creates immediate sales opportunities when you open.
Clearly explain what makes your store unique and why customers should care about your launch. What problem do you solve?
Use max-w-narrower (default) for focused experience. The narrow width keeps attention on your message and signup form.
Create excitement about your launch. Use enthusiastic, benefit-focused language. Avoid vague "coming soon" messaging.
Offer exclusive launch discount or early access to email subscribers. "Sign up for 15% off opening day" increases conversions.
Share password or preview link with testers, investors, partners, and press for feedback before public launch.
Mention any press coverage, awards, founder credentials, or milestones that build credibility and trust.
Test password page on mobile devices. Many visitors will discover your store on mobile first.
Before launch, export email list from Shopify admin. Import to email marketing platform for launch campaign.
## Related guides
Learn how to enable and manage password protection in Shopify
Customize your 404 error page template
Use collected emails for launch campaigns in Shopify
Configure color schemes used on password page