> ## Documentation Index
> Fetch the complete documentation index at: https://docs.digifist.com/llms.txt
> Use this file to discover all available pages before exploring further.
# Vendors page
> Customize the layout and features of your vendors page.
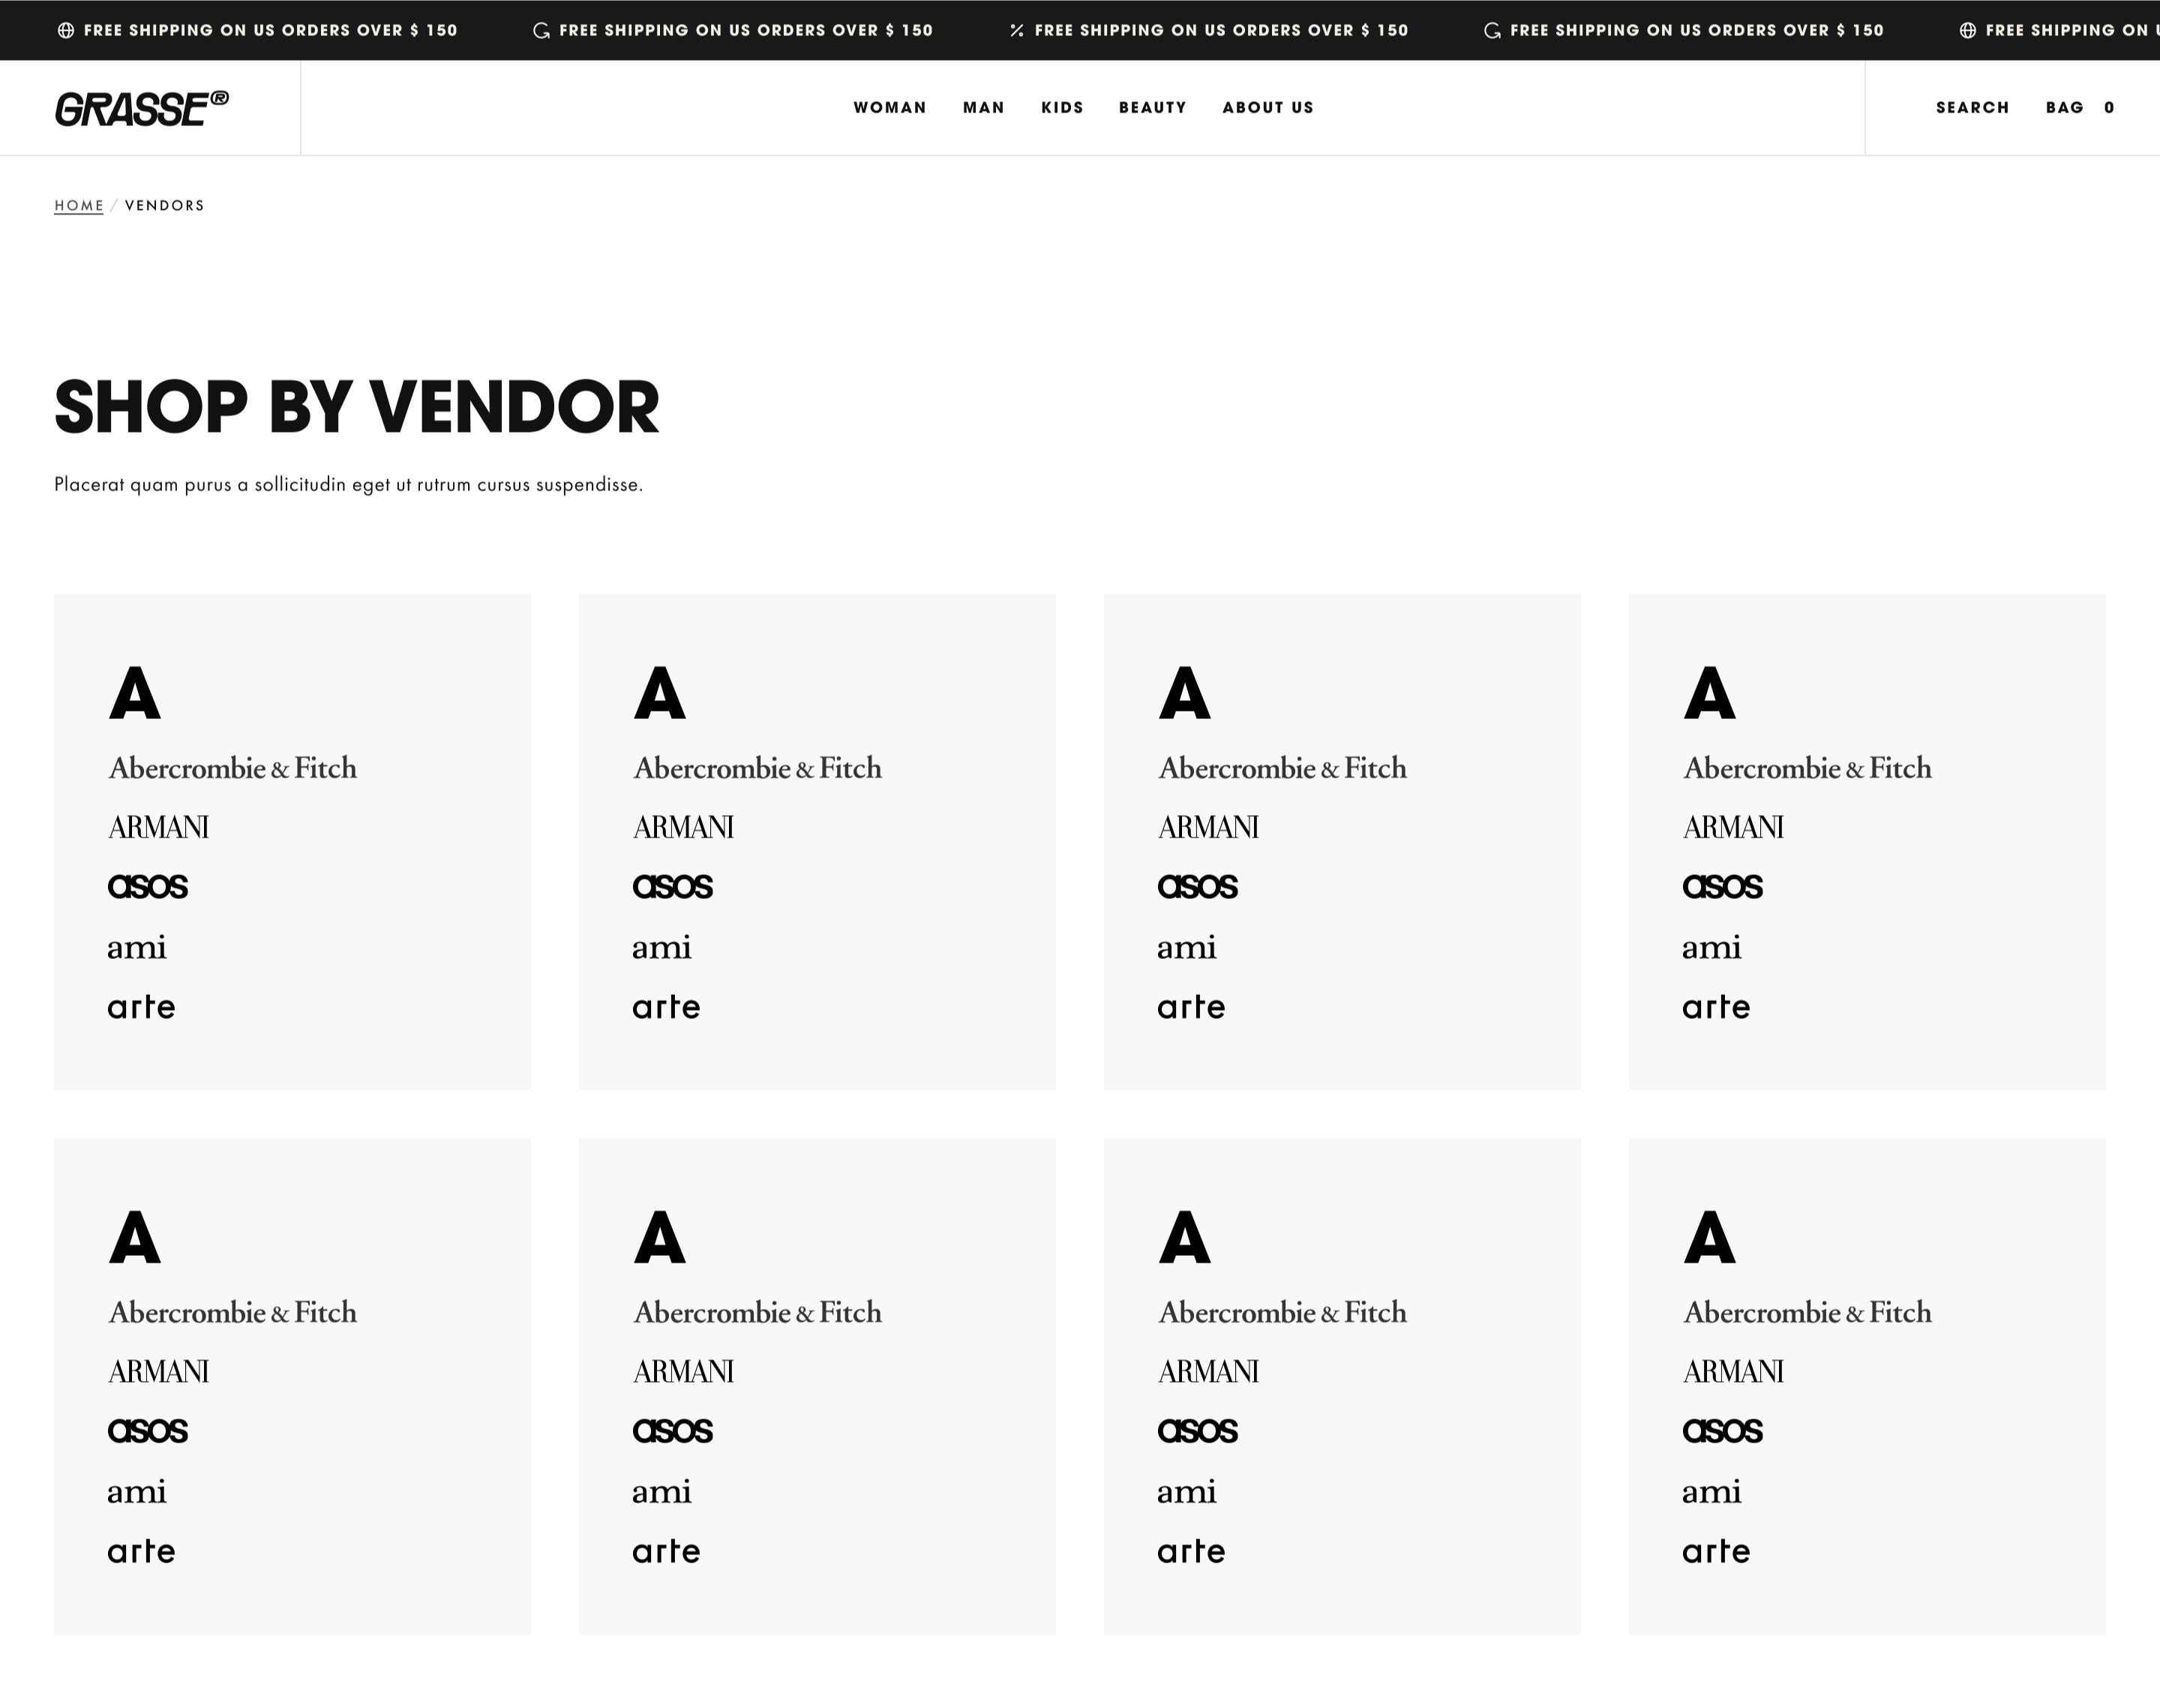
The vendors page displays a list of brands or manufacturers featured in your store. You can customize vendor card appearance, logos, alphabetical navigation, and metaobject connections to create an organized directory of your brand partners.
 ## What this section controls
This section manages:
* **Vendor directory display** - Showcase all brands/manufacturers in your store
* **Vendor logos** - Display brand logos with customizable height
* **Alphabetical navigation** - Enable A-Z quick navigation for browsing
* **Metaobject integration** - Connect to Shopify metaobjects for vendor data
* **Vendor cards** - Customize card appearance and color scheme
* **Section layout** - Adjust section width, color scheme, and spacing
## Getting started
You need to create a metaobject definition for vendors.
1. In the Shopify admin, go to **Content → Metaobjects → Add definition**
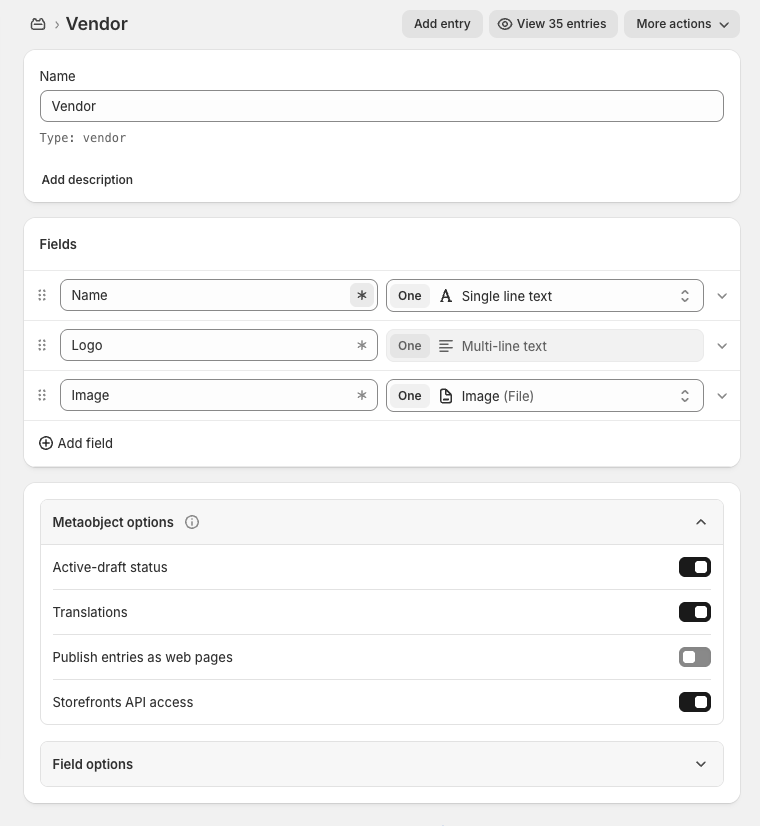
2. Create a **Vendor** metaobject definition:
* **Name:** Vendor
* **Handle:** vendor
3. Add following fields to the definition:
| Field Name | Type |
| :--------- | :--------------------- |
| Name | One : Single line text |
| Logo | One : Multi-line text |
| Image | One : Image (File) |
4. Save the definition
Field keys (handles) must be exactly: `name`, `logo`, `image`. If the handles differ, the theme will not be able to read the vendor data.
Create individual vendor entries in the metaobject:
1. Go to **Content → Metaobjects → Vendor**
2. Click **Add entry**
3. Fill in vendor details (Name, Logo, Image)
4. Repeat for all vendors
From Shopify admin, access the Theme Customizer
In the left sidebar, click **Pages** > **Vendor list**
In the Vendor List section, select the created **Vendor** metaobject definition
Enable logo display, alphabetical navigation, and set logo height and color scheme
## What this section controls
This section manages:
* **Vendor directory display** - Showcase all brands/manufacturers in your store
* **Vendor logos** - Display brand logos with customizable height
* **Alphabetical navigation** - Enable A-Z quick navigation for browsing
* **Metaobject integration** - Connect to Shopify metaobjects for vendor data
* **Vendor cards** - Customize card appearance and color scheme
* **Section layout** - Adjust section width, color scheme, and spacing
## Getting started
You need to create a metaobject definition for vendors.
1. In the Shopify admin, go to **Content → Metaobjects → Add definition**
2. Create a **Vendor** metaobject definition:
* **Name:** Vendor
* **Handle:** vendor
3. Add following fields to the definition:
| Field Name | Type |
| :--------- | :--------------------- |
| Name | One : Single line text |
| Logo | One : Multi-line text |
| Image | One : Image (File) |
4. Save the definition
Field keys (handles) must be exactly: `name`, `logo`, `image`. If the handles differ, the theme will not be able to read the vendor data.
Create individual vendor entries in the metaobject:
1. Go to **Content → Metaobjects → Vendor**
2. Click **Add entry**
3. Fill in vendor details (Name, Logo, Image)
4. Repeat for all vendors
From Shopify admin, access the Theme Customizer
In the left sidebar, click **Pages** > **Vendor list**
In the Vendor List section, select the created **Vendor** metaobject definition
Enable logo display, alphabetical navigation, and set logo height and color scheme
 ## Section Settings
Control how vendor information is displayed on the page.
**Type:** Toggle\
**Default:** Enabled
Displays the vendor's logo when available from the metaobject. If disabled, only vendor names will be shown.
Enable logos for a more visual, brand-focused directory. Logos help customers quickly identify familiar brands.
**Type:** Range slider\
**Range:** 20-200 pixels\
**Default:** 60
Controls the displayed height of vendor logos. Width adjusts automatically to maintain aspect ratio.
Standard logo height of 50-80px works well for most stores. Larger sizes (100-150px) work better for premium brand showcases.
**Type:** Toggle\
**Default:** Enabled
Enables alphabetical navigation (A-Z) for browsing vendors. Creates clickable letter links that jump to vendors starting with that letter.
Enable for stores with 20+ vendors to help customers quickly find specific brands. Less useful for smaller vendor lists.
Connect the vendor data source from Shopify metaobjects.
**Type:** Metaobject definition picker\
**Required:** Yes
Select the metaobject that contains your vendor entries. This must be the "Vendor" metaobject definition created in setup.
Without selecting a metaobject, no vendors will display on the page. The metaobject must have the correct field structure (name, logo, image).
After selecting the metaobject, vendor entries will automatically appear on the Vendors page. No additional configuration needed.
Customize the appearance of individual vendor cards.
**Type:** Dropdown\
**Default:** scheme-1
Sets the color scheme used for vendor cards. Available schemes are defined in **Theme settings > Colors**.
Use a neutral or branded color scheme that complements your vendor logos without overpowering them.
Control the overall section layout, width, and spacing.
**Type:** Dropdown\
**Options:** max-w-page, max-w-fluid\
**Default:** max-w-page
Maximum width of the vendors section:
* **max-w-page** - Standard container matching theme width
* **max-w-fluid** - Wider container utilizing more screen space
Use max-w-fluid for large vendor directories with many brands to display more vendors per row.
**Type:** Dropdown\
**Default:** scheme-1
Select the color scheme for the overall vendors section. Available schemes are defined in **Theme settings > Colors**.
**Type:** Dropdown\
**Options:** No (0), S (1), M (2), L (4), XL (6)\
**Default:** M (2)
Padding above the vendors section, controlling vertical space from the header.
**Type:** Dropdown\
**Options:** No (0), S (1), M (2), L (4), XL (6)\
**Default:** M (2)
Padding below the vendors section, controlling vertical space to the footer.
## Metaobject setup requirements
To display vendors on this page, you must create a properly structured metaobject definition.
### Required metaobject structure
**Definition details:**
* **Name:** Vendor
* **Handle:** vendor (must be exactly this)
**Required fields:**
| Field Name | Handle | Type | Required |
| ---------- | ------- | ---------------- | -------- |
| Name | `name` | Single line text | Yes |
| Logo | `logo` | Multi-line text | No |
| Image | `image` | Image (File) | No |
**Critical:** Field handles must be exactly `name`, `logo`, and `image`. If handles differ, the theme cannot read vendor data.
### Adding vendor entries
After creating the metaobject definition:
1. Go to **Content → Metaobjects → Vendor**
2. Click **Add entry** for each vendor
3. Fill in required information:
* **Name** - Vendor/brand name (e.g., "Nike", "Adidas")
* **Logo** - SVG code or HTML for vector logos
* **Image** - Upload brand logo as image file
4. Save each entry
Use **Logo** field for SVG code to maintain perfect quality at any size. Use **Image** field for PNG/JPG logos when SVG isn't available.
## Common use cases
Showcase all brands carried in your store.
**Configuration:**
* Show vendor logo: Enabled
* Logo height: 60-80px
* Show navigation: Enabled (for 20+ brands)
* Section width: max-w-fluid
* Color scheme: Neutral (scheme-1)
**Metaobject:**
* 50+ vendor entries
* Consistent logo sizing
* All entries with logos
Highlight luxury or premium brand partnerships.
**Configuration:**
* Show vendor logo: Enabled
* Logo height: 100-120px (larger for impact)
* Show navigation: Disabled (curated list)
* Section width: max-w-page
* Color scheme: Elegant/premium scheme
**Metaobject:**
* 10-20 vendor entries
* High-quality logos
* Selective brand curation
List product manufacturers for B2B or technical stores.
**Configuration:**
* Show vendor logo: Enabled
* Logo height: 50-60px
* Show navigation: Enabled
* Section width: max-w-fluid
* Color scheme: Professional scheme
**Metaobject:**
* 30-100+ manufacturer entries
* Technical/industrial brands
* Alphabetical organization
Feature local makers and small businesses.
**Configuration:**
* Show vendor logo: Enabled
* Logo height: 80-100px
* Show navigation: Disabled
* Section width: max-w-page
* Color scheme: Warm/community scheme
**Metaobject:**
* 5-15 artisan entries
* Personal brand stories
* High-quality artisan logos/photos
Display authorized dealer/retailer network.
**Configuration:**
* Show vendor logo: Enabled
* Logo height: 60px
* Show navigation: Enabled (for many locations)
* Section width: max-w-fluid
* Color scheme: Brand-aligned scheme
**Metaobject:**
* Store location entries
* Consistent retailer logos
* Organized by region/alphabetically
## Best practices
Maintain consistent logo sizing and quality across all vendors. Use vector (SVG) logos when possible for crisp display at any size.
Enable alphabetical navigation for stores with 20+ vendors. For smaller lists, navigation adds unnecessary complexity.
Standard 50-80px works for most stores. Premium brands: 100-150px. Many small logos: 40-60px to fit more per row.
Use exact handles (`name`, `logo`, `image`) as specified. Any variation will break the integration.
Optimize logo images before upload. Use PNG with transparency or JPG. Keep file sizes under 200KB for fast loading.
Prefer SVG logos in the Logo field over image files. SVGs scale perfectly and maintain quality at any size.
Use neutral or branded color scheme that complements vendor logos without competing visually.
For premium positioning, curate vendor list to feature key partnerships. Don't feel obligated to list every brand.
Test vendor card layout on mobile. Logos should remain legible. Consider slightly larger logo height for mobile users.
Keep vendor list current. Remove discontinued brands, add new partnerships. Update logos when brands rebrand.
## Related guides
Learn more about Shopify metaobjects and custom data structures
Similar list page layout for displaying collections
## Section Settings
Control how vendor information is displayed on the page.
**Type:** Toggle\
**Default:** Enabled
Displays the vendor's logo when available from the metaobject. If disabled, only vendor names will be shown.
Enable logos for a more visual, brand-focused directory. Logos help customers quickly identify familiar brands.
**Type:** Range slider\
**Range:** 20-200 pixels\
**Default:** 60
Controls the displayed height of vendor logos. Width adjusts automatically to maintain aspect ratio.
Standard logo height of 50-80px works well for most stores. Larger sizes (100-150px) work better for premium brand showcases.
**Type:** Toggle\
**Default:** Enabled
Enables alphabetical navigation (A-Z) for browsing vendors. Creates clickable letter links that jump to vendors starting with that letter.
Enable for stores with 20+ vendors to help customers quickly find specific brands. Less useful for smaller vendor lists.
Connect the vendor data source from Shopify metaobjects.
**Type:** Metaobject definition picker\
**Required:** Yes
Select the metaobject that contains your vendor entries. This must be the "Vendor" metaobject definition created in setup.
Without selecting a metaobject, no vendors will display on the page. The metaobject must have the correct field structure (name, logo, image).
After selecting the metaobject, vendor entries will automatically appear on the Vendors page. No additional configuration needed.
Customize the appearance of individual vendor cards.
**Type:** Dropdown\
**Default:** scheme-1
Sets the color scheme used for vendor cards. Available schemes are defined in **Theme settings > Colors**.
Use a neutral or branded color scheme that complements your vendor logos without overpowering them.
Control the overall section layout, width, and spacing.
**Type:** Dropdown\
**Options:** max-w-page, max-w-fluid\
**Default:** max-w-page
Maximum width of the vendors section:
* **max-w-page** - Standard container matching theme width
* **max-w-fluid** - Wider container utilizing more screen space
Use max-w-fluid for large vendor directories with many brands to display more vendors per row.
**Type:** Dropdown\
**Default:** scheme-1
Select the color scheme for the overall vendors section. Available schemes are defined in **Theme settings > Colors**.
**Type:** Dropdown\
**Options:** No (0), S (1), M (2), L (4), XL (6)\
**Default:** M (2)
Padding above the vendors section, controlling vertical space from the header.
**Type:** Dropdown\
**Options:** No (0), S (1), M (2), L (4), XL (6)\
**Default:** M (2)
Padding below the vendors section, controlling vertical space to the footer.
## Metaobject setup requirements
To display vendors on this page, you must create a properly structured metaobject definition.
### Required metaobject structure
**Definition details:**
* **Name:** Vendor
* **Handle:** vendor (must be exactly this)
**Required fields:**
| Field Name | Handle | Type | Required |
| ---------- | ------- | ---------------- | -------- |
| Name | `name` | Single line text | Yes |
| Logo | `logo` | Multi-line text | No |
| Image | `image` | Image (File) | No |
**Critical:** Field handles must be exactly `name`, `logo`, and `image`. If handles differ, the theme cannot read vendor data.
### Adding vendor entries
After creating the metaobject definition:
1. Go to **Content → Metaobjects → Vendor**
2. Click **Add entry** for each vendor
3. Fill in required information:
* **Name** - Vendor/brand name (e.g., "Nike", "Adidas")
* **Logo** - SVG code or HTML for vector logos
* **Image** - Upload brand logo as image file
4. Save each entry
Use **Logo** field for SVG code to maintain perfect quality at any size. Use **Image** field for PNG/JPG logos when SVG isn't available.
## Common use cases
Showcase all brands carried in your store.
**Configuration:**
* Show vendor logo: Enabled
* Logo height: 60-80px
* Show navigation: Enabled (for 20+ brands)
* Section width: max-w-fluid
* Color scheme: Neutral (scheme-1)
**Metaobject:**
* 50+ vendor entries
* Consistent logo sizing
* All entries with logos
Highlight luxury or premium brand partnerships.
**Configuration:**
* Show vendor logo: Enabled
* Logo height: 100-120px (larger for impact)
* Show navigation: Disabled (curated list)
* Section width: max-w-page
* Color scheme: Elegant/premium scheme
**Metaobject:**
* 10-20 vendor entries
* High-quality logos
* Selective brand curation
List product manufacturers for B2B or technical stores.
**Configuration:**
* Show vendor logo: Enabled
* Logo height: 50-60px
* Show navigation: Enabled
* Section width: max-w-fluid
* Color scheme: Professional scheme
**Metaobject:**
* 30-100+ manufacturer entries
* Technical/industrial brands
* Alphabetical organization
Feature local makers and small businesses.
**Configuration:**
* Show vendor logo: Enabled
* Logo height: 80-100px
* Show navigation: Disabled
* Section width: max-w-page
* Color scheme: Warm/community scheme
**Metaobject:**
* 5-15 artisan entries
* Personal brand stories
* High-quality artisan logos/photos
Display authorized dealer/retailer network.
**Configuration:**
* Show vendor logo: Enabled
* Logo height: 60px
* Show navigation: Enabled (for many locations)
* Section width: max-w-fluid
* Color scheme: Brand-aligned scheme
**Metaobject:**
* Store location entries
* Consistent retailer logos
* Organized by region/alphabetically
## Best practices
Maintain consistent logo sizing and quality across all vendors. Use vector (SVG) logos when possible for crisp display at any size.
Enable alphabetical navigation for stores with 20+ vendors. For smaller lists, navigation adds unnecessary complexity.
Standard 50-80px works for most stores. Premium brands: 100-150px. Many small logos: 40-60px to fit more per row.
Use exact handles (`name`, `logo`, `image`) as specified. Any variation will break the integration.
Optimize logo images before upload. Use PNG with transparency or JPG. Keep file sizes under 200KB for fast loading.
Prefer SVG logos in the Logo field over image files. SVGs scale perfectly and maintain quality at any size.
Use neutral or branded color scheme that complements vendor logos without competing visually.
For premium positioning, curate vendor list to feature key partnerships. Don't feel obligated to list every brand.
Test vendor card layout on mobile. Logos should remain legible. Consider slightly larger logo height for mobile users.
Keep vendor list current. Remove discontinued brands, add new partnerships. Update logos when brands rebrand.
## Related guides
Learn more about Shopify metaobjects and custom data structures
Similar list page layout for displaying collections